There are some examples on the internet to demonstrate how to configure spring-boot version 3+ to use a SAML 2.0 identity provider, but they are using OKTA and not KeyCloak.
This is a demo of implementing SAML 2.0 with spring boot using KeyCloak as IDP. It was pretty challenging because of the little changes to be made when using KeyCloak instead of Okta or adfs.
Example available!
I implemented an example of a spring boot application with KeyCloak and SAML 2.0. You can find it at github here:
https://github.com/carstenSpraener/keycloak-examples
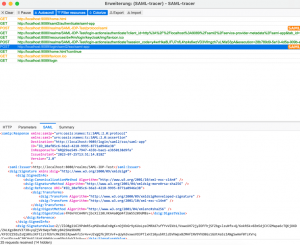
Tip
Error detection in SAML can be challenging. But it can be simplified by installing some SAML debugging plugins into the browser. I had a good experience with the SAML Tracer plugin. When you activate, it will record the SAML-Requests and show them in a separate panel:
Necessary steps
The necessary steps are the same as using Okta, adsf, or any other SAML 2.0 platform. They are:
- Create a basic spring boot application.
- Configure a client in a realm to use SAML 2.0.
- Configure Spring Boot to use SAML 2.0 as SSO implementation.
- Connect them via metadata URL and private key.
It’s quite simple, but the devil is in the details. So, let’s go through all these steps in Detail.
Create a basic spring boot application
This task is nearly out of the box, but you have to add the following dependencies to your Gradle/maven project (example for Gradle):
implementation 'org.spring framework.boot:spring-boot-starter-security'

implementation 'org.spring framework.security:spring-security-saml2-service-provider:6.1.2'
implementation 'org.thymeleaf.extras:thymeleaf-extras-springsecurity6'
And here is the first Detail! Spring security for saml 2.0 relies on openSaml, which is not hosted on the standard maven repository. So you have to add the following repository to your build file:
repositories {
    mavencentral()
    maven {
        url "https://build.shibboleth.net/maven/releases"
    }
}
Now, Gradle can resolve the dependency to openSaml.
Configuring a client for SAML 2.0 in KeyCloak
You should know what a realm is and how to create one in KeyCloak.
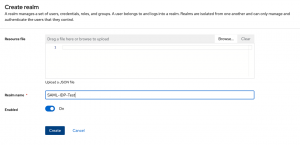
So now, this Realm has to be selected, and a new client has to be created inside that Realm.
Here are the steps:
Again: Be sure that you selected the correct Realm.
Create a new client in that Realm
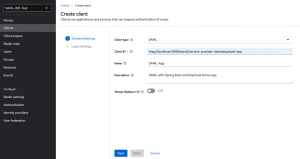
Notice:
- Client Type is SAML. The default is OpenID Connect. This default has to be changed.
- Detail! The ClientId is the saml2 service provider metadata URL.
- The rest is for information.
On the second page, you need to add the following information:
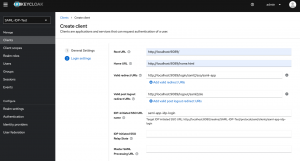
- The Root URL is the URL of the spring boot application.
- The Home URL is the Homepage URL of the application.
- Valid redirect URIs are the URI(s) to which the user is redirected after a valid login.
- The IDP-Initiated SSO URL name is a postfix for a KeyCloak URL that can be called to log in to the client via KeyCloak. This URL is for IDP-initiated (in this case KeyCloak initiated) login.
Enable Logout in KeyCloak
When your client initiates a logout, the user should be redirected to the Spring Boot Application after the logout succeeded. It would be best to tell KeyCloak which URL the user should be redirected to. Open the Advanced tab in the client’s panel and go to the Logout Service POST Binding URL field.
Here, enter the URL /logout/saml2/slo. As shown here:

That’s it for now. Hit the save button, and your client is created in KeyCloak.
KeyCloak now knows about a client app that will use it as an IDP with the SAML protocol. But the relationship has to be trusted. So, there has
to be some key exchanges. We will do that in a further step. But first, let’s go to the spring boot side to use KeyCloak and create the needed keys and certificates.
Binding your spring boot application to KeyCloak SAML
The SAML-2.0 support for spring boot relies on two main classes that must be created and configured. It is the SecurityFilterChain and a RelyingPartyRegistrationRepository.
The Spring Boot app is the relying party because it relies on the assertions are given from the assertion parts (KeyCloak in this case).
The RelyingPartyRegistrationRepository stores the registration of this relying party to some assertion party by a registration ID.
Creating keys and certificates
SAML communicates via XML-Messages routed through the browser. The messages need to be at least signed to protect them from fake messages. For this purpose, the application requires a key and a certificate to sign the messages sent from the application to KeyCloak. (As it is needed for logout)
To create a pair of keys and certificates, go to thensrc/main/resources/config directory and execute the following
command:
openssl req -newkey rsa:2048 -nodes -keyout rp-key.key -x509 -days 365 -out rp-certificate.crtThis command will create two files, rp-key.key and rp-certificate.key. These are the credentials that the Spring Boot application will use to sign messages for KeyCloak. They are valid for 365 days.
Now open the application.yaml file and configure these two files there so we can easily refer them from the application:
saml2:
  rp:
    signing:
      # This pair was generated with the following command:
      # openssl req -newkey rsa:2048 -nodes -keyout rp-key.key -x509 -days 365 -out rp-certificate.crt
      cert-location: /config/rp-certificate.crt
      key-location: /config/rp-key.key
With this, we can later refer to the files in any spring boot component
by:
@Value("${saml2.rp.signing.cert-location}")
private String rpSigningCertLocation;

@Value("${saml2.rp.signing.key-location}")
private String rpSigningKeyLocation;
KeyCloak-Certificate
The third certificate needed is the KeyCloak signing certificate, which the application needs to verify that the message is coming from KeyCloak. To get the certificate, go to the KeyCloak administration site, make sure you selected the right Realm, and then go to Realm Setting and open the Keys Tab. The correct certificate is the RSH256 with Use „SIG“. Click on the marked Certificate button:
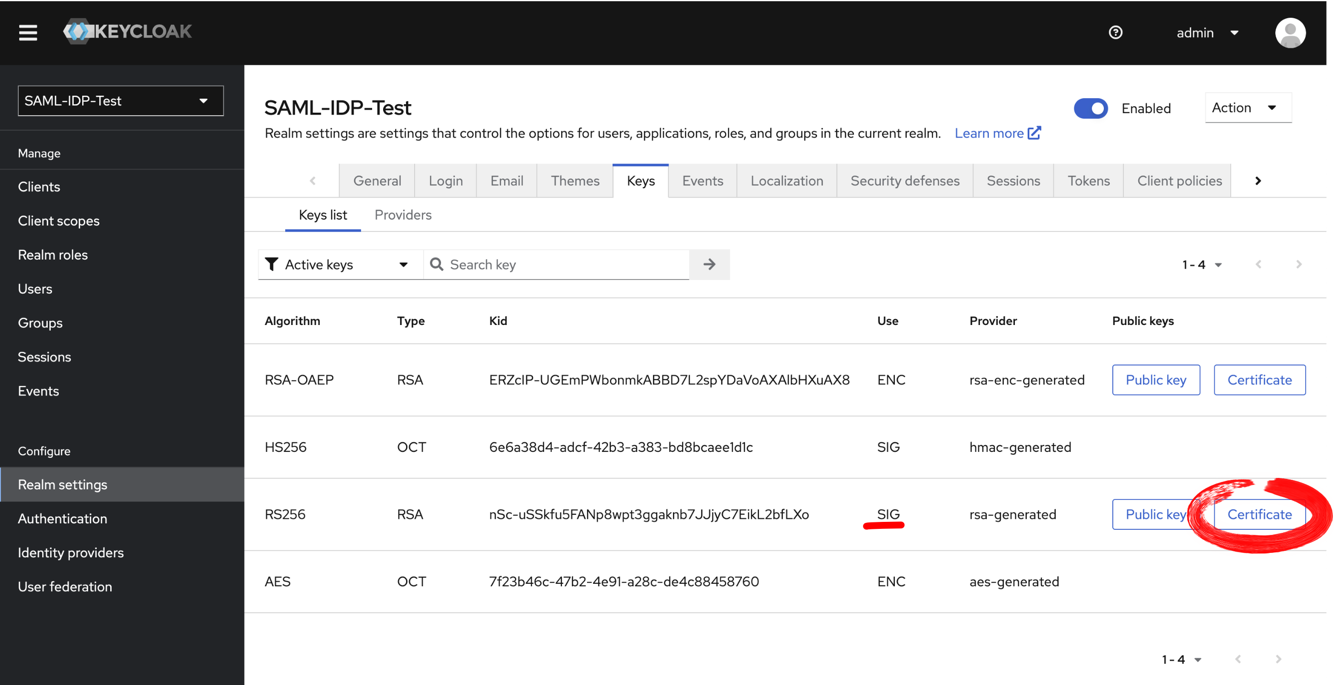
This button will open the certificate that you can copy into the clipboard.
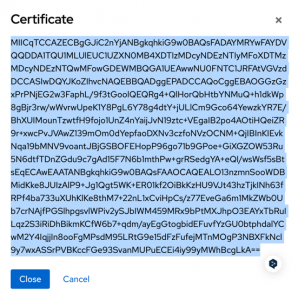
When you copy the certificate into the clipboard, open the application.yaml and paste the certificate under the key saml2.ap.signing-cert like this:
saml2:
  ap:
    signing-cert: MIICqTCCAZECBgGJiC2o2jANBgkqhkiG...
The certificate can also be found in the same descriptor XML of your Realm. It is the body of the element X509Certificate.
Note: This is my way of referring to the keys and certificates. There are many other ways to do so. But, well, this is how I did it.
No, let’s get back to the spring boot application.
Enable and Configure Spring Boot security
The next step is to create a configuration bean that also enables SpringSecurity. For that, create a new class and do the following annotation at the class level:
@Configuration
@EnableWebSecurity
public class SamlServiceProviderConfig {
    ...
These annotations mark the class as a configuration source and will also enable web security for the application.
Next, we need a bean that configures the HTTP security. This configuration is done by creating a new method that returns a SecurityFilterChain and receives a HttpSecurity parameter. Here is an example:
import static org. spring framework.security.config.Customizer.withDefaults;
...

@Bean
public SecurityFilterChain filterChain(HttpSecurity http) throws Exception {
    HTTP
        .authorizeHttpRequests(authorize -> authorize
            .requestMatchers("/ping").permitAll()
            .requestMatchers("/").permitAll()
            .requestMatchers("**").authenticated()
        )
        .logout( logout -> logout
            .logoutUrl("/")
        )
        //Configure saml2 login with the default values
        .saml2Login(withDefaults())
        // configure saml2 logout with the default values
        .saml2Logout(withDefaults())
    ;
    return http.build();
}
The first part is a typical spring boot security setup based on URL patterns. For SAML, you need to set up saml2Login and saml2Logout with default values.
The method withDefaults() comes from the static import of the class Customizer , which is shown in the first line.
As mentioned above, we need to create and configure a RelyingPartyRegistrationRepository.
So, there needs to be a second method that creates this repository:
@Value("${saml2.ap.metadata.location}")
private String metadataLocation;

...

@Bean
public RelyingPartyRegistrationRepository relyingPartyRegistrations() throws Exception {
    Resource signingCertResource = new ClassPathResource(this.rpSigningCertLocation);
    Resource signingKeyResource = new ClassPathResource(this.rpSigningKeyLocation);
    try (
            InputStream is = signingKeyResource.getInputStream();
            InputStream certIS = signingCertResource.getInputStream();
    ) {
        X509Certificate rpCertificate = X509Support.decodeCertificate(certIS.readAllBytes());
        RSAPrivateKey rpKey = RsaKeyConverters.pkcs8().convert(is);
        final Saml2X509Credential rpSigningCredentials = Saml2X509Credential.signing(rpKey, rpCertificate);

        X509Certificate apCert = X509Support.decodeCertificate(apCertificate);
        Saml2X509Credential apCredential = Saml2X509Credential.verification(apCert);

        RelyingPartyRegistration registration = RelyingPartyRegistrations
                .fromMetadataLocation(metadataLocation)
                .registrationId("saml-app")
                .singleLogoutServiceLocation("{baseUrl}/logout/saml2/slo")
                .signingX509Credentials(c -> c.add(rpSigningCredentials))
                .assertingPartyDetails(party -> party
                        .wantAuthnRequestsSigned(true)
                        .verificationX509Credentials(c -> c.add(apCredential))
                )
                .build();
        return new InMemoryRelyingPartyRegistrationRepository(registration);
    }
}
That’s much stuff going on here. But let’s break it down.
The first rows are about reading the certificates and keys used to sign and verify the SAML messages. As we configured two values to hold the path to the files, we can now easily access them, create a Resource for them, open an InputStream to the files, and create a Saml2X509Credetial object:
X509Certificate rpCertificate = X509Support.decodeCertificate(certIS.readAllBytes());
RSAPrivateKey rpKey = RsaKeyConverters.pkcs8().convert(is);
final Saml2X509Credential rpSigningCredentials = Saml2X509Credential.signing(rpKey, rpCertificate);
Detail! To use the certificate and key for signing, you have to create the credential with the Saml2X509Credential.singning() method.
To create the assertion party verification credentials, we have to get the certificate from the application.yaml, decode it to an X509 certificate, and generate its verification credentials.
X509Certificate apCert = X509Support.decodeCertificate(apCertificate);
Saml2X509Credential apCredential = Saml2X509Credential.verification(apCert);
Detail! To create a signing verification credential object, you have to call the Saml2X509Credential.verification() method!
Don’t mix up the singing and verification methods of the Saml2X509Credential class. That costs me some time to debug.
Create the registration
The following lines of code are about creating a registration. This registration tells SAML2 in Spring Boot what your identity provider is and how to verify it.
So the line is:
@Value("${saml2.ap.metadata.location}")
private String metadataLocation;

...

RelyingPartyRegistration registration = RelyingPartyRegistrations
        .fromMetadataLocation(metadataLocation)
        .registrationId("saml-app")
        .singleLogoutServiceLocation("{baseUrl}/logout/saml2/slo")
        .signingX509Credentials(c -> c.add(rpSigningCredentials))
        .assertingPartyDetails(party -> party
                .wantAuthnRequestsSigned(true)
                .verificationX509Credentials(c -> c.add(apCredential))
        )
        .build();
The used metadata location is the URL to the SAML-Descriptor of your Realm.
This URL can be found on the KeyCloak Realm Settings page:
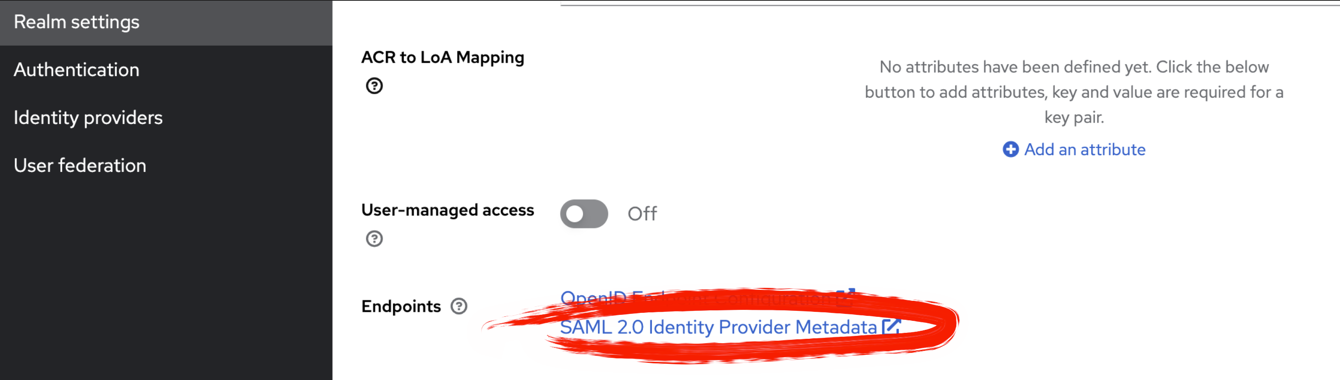
Copy that links address and add it to the application.yaml under the keysaml2.ap.metadata.location like:
saml2:
  ap:
    metadata:
      location: http://localhost:8080/realms/SAML-IDP-Test/protocol/saml/descriptor
    signing-cert: MIICqTCCAZECBgGJiC2o2j...
With this link stored in the variable metadataLocation we can now start and create the RelyingPartyRegistration by using ATTENTION RelyingPartyRegistrations (plural) to build the desired instance.
You have to set the following values:
- the metadata location
- the registrationId: This is an arbitrary string. With this string, saml can refer to this APs registration.
- a singleLogoutServicelocation as seen in the example
- the signing certificate created in the previous step
- and the assertingParty parameters.
Our asserting party wants the Authentication Requests to be signed, and it will sign its requests with the certificate stored in the apCredential.
Detail! The Certificate is also included in the descriptor.xml of the IDP/AP, but for some reason, it did not work without setting it explicitly in the RelyingPartyRegistration.
Importing RP-Certificate into KeyCloak
We established a secured connection from the IDP/AP (KeyCloak) to the RP (Spring-Boot Application) with the above steps. But we still need to tell KeyCloak about the signature of the Spring-Boot Application. This upload of the certificate is the final step to establishing the connection.
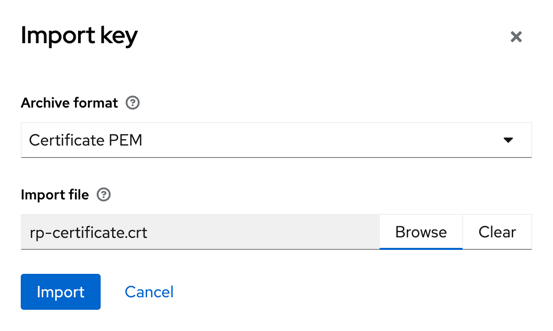
Import the RPs key into KeyCloak
Go to the KeyCloak administrators page. Check that the correct Realm is selected.
Then, navigate to the Clients Panel, select the Spring-Boot App client, and open the Keys tab. It should look like this:
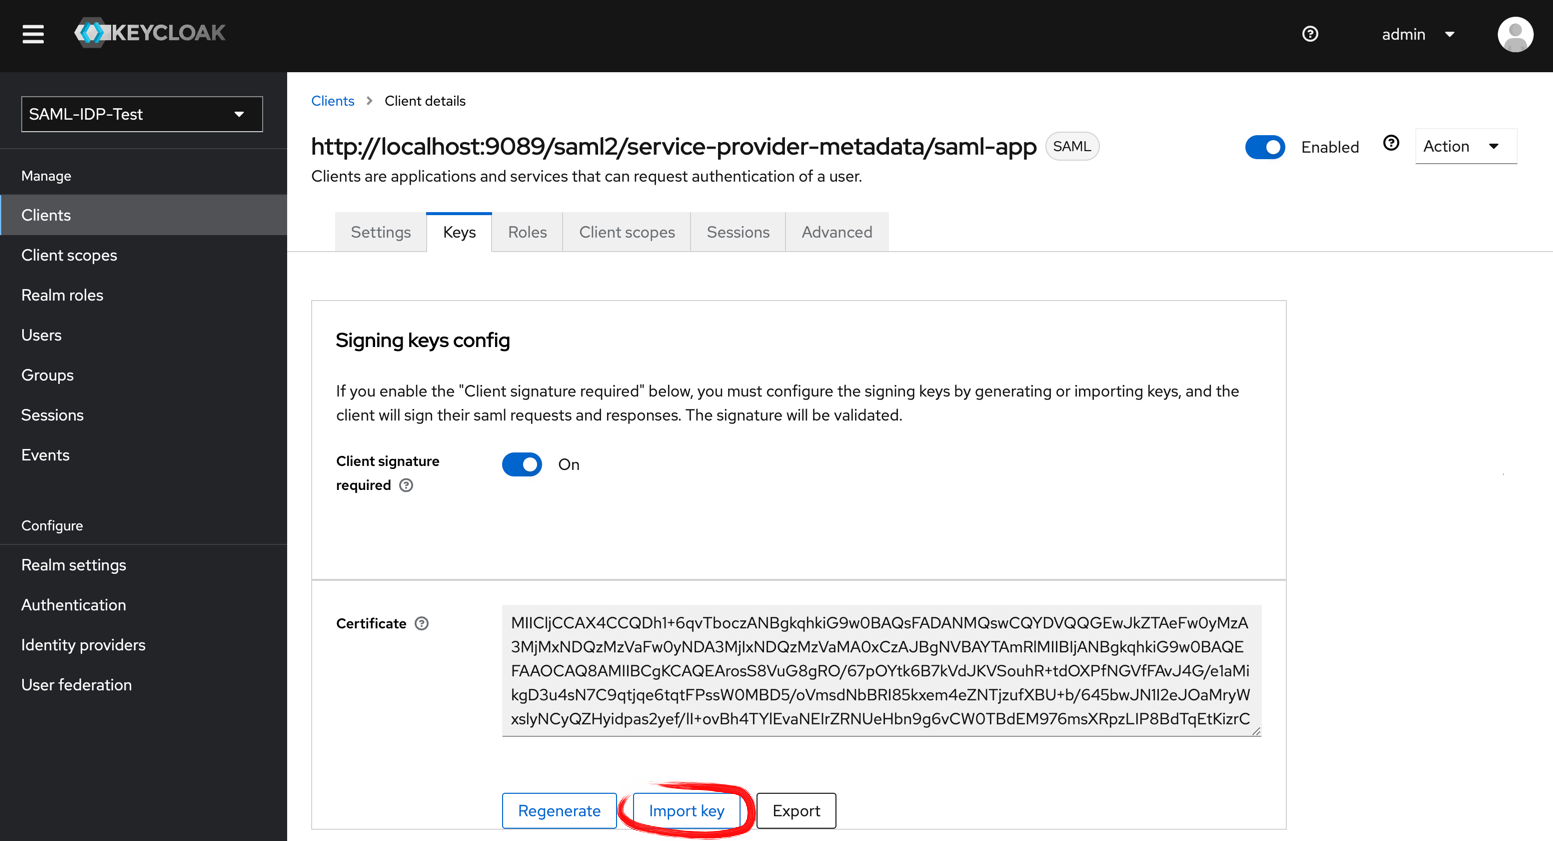
The Import Key button will open a file import dialog. Choose thesrc/main/resources/config/rp-certificate.crt File as the certificate to
import. Select Certificate PEM as Archive format and press Import
Well done! Your login into the application via SAML with KeyCloak as an IDP. It should work now.
But wait! There is no user… So, create a user in the Realm, and you should be able to log in with that user.
Let’s Talk About Your Project
Just send me a message!